Basic File IO – Java/C#/C++ examples
File Input/Output (FileIO) is a necessary piece of programming for software development where outputs need to be saved, or inputs used for calculations. All pieces of software create, to some degree, data which needs to be output to a permanent source on the file system. These files are not written magically and need to be done by the programmers working on the software. The problem is, each language handles FileIO operations differently and if, like me, you work with multiple languages it can become confusing and time-consuming to keep searching for the correct FileIO commands for your current project. Good programming can come down to knowing the basic operation you want to perform and then searching for the implementation in your language (for example, searching for ‘Java file IO’ in Google). This post then is as much a reminder for me as it may hopefully become useful for you, to save me having to search the web for implementations I have instead combined them into this one post for the three languages I commonly work in – Java, C# and C++.
The code shown in this post may or may not work for you. It compiled for me on my machine, however, the purpose is not to allow for copy/paste, but to teach and inform (hopefully) so that you can take the bare bones of what is here and implement them into bigger projects. It is therefore expected that you would have some understanding of programming (in the language you’re inspecting) and will understand what is included here. If you don’t, then either contact me or do some Googling around the subject.
The examples used in this post all refer to simple CSV (Character Separated Value) files. Other file formats will work with what is included here, however, some require additional coding for efficient use. A good example of an external library for FileIO are the Google Protocol Buffers which are language neutral ways of saving structured data (link at the bottom of this page).
Java FileIO
Java is a very nice language for beginners (in my opinion) but, as discussed previously, is not as powerful as a C#/C++ combination. Nevertheless, if you know Java, or at least the bare bones of it, you can quickly and easily create some scripts to optimise your workflow. An example of this (and the prompt for this post) was the need for me to take a CSV file and re-structure it (and remove some data) and output it to a new CSV file. For one file, this might take a while but you could do this manually in Excel (which supports CSV format) or another text editor. However, when you have multiple files to convert, it can be easier to write a script which reads in a file, performs some operations on it and outputs the results to a new file. Java is very good for this, particularly if you use a development engine such as BlueJ or Eclipse. For simple FileIO operations that don’t require a GUI, these can be quickly implemented in Java.
Firstly, the Java FileIO operations are contained within the java.io library, so you will need to import this to your project for any FileIO operations (unless you wish to do the long notation of java.io.file, for example). The java.io library opens up a range of IO operations, however, for the purpose of this post we will be concentrating on the BufferedReader, BufferedWriter, FileReader and FileWriter.
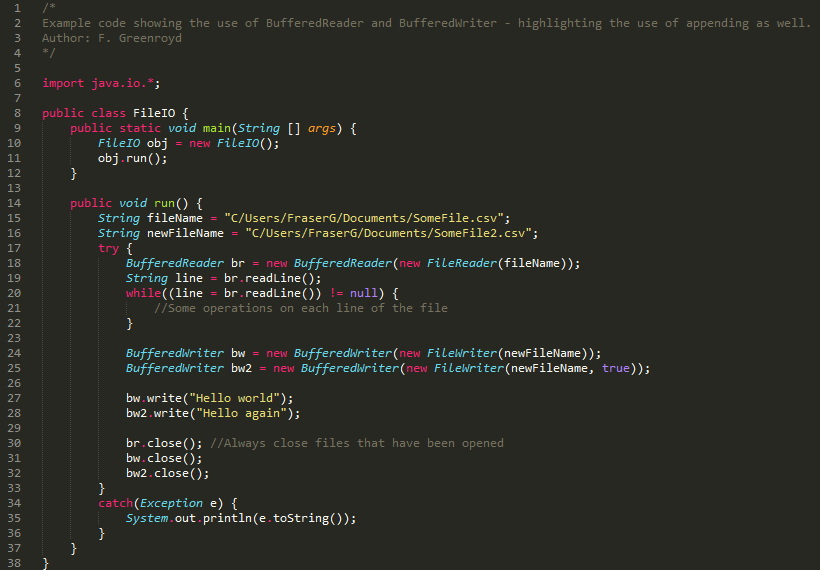
With all FileIO operations, errors can occur if the file is not accessible, is blocked, doesn’t exist, or any other exception you can think of. As such, it’s important to place any FileIO operations within a Try-Catch statement to ensure your program dies gracefully in the event of an error (for example you can output a message to the user to inform them of an issue). This is found in this example between lines 17 and 36, where the brunt of the FileIO operations occur. If you need your BufferedReader (or other FileIO variable) outside of the Try-Catch statement (being aware here of scope) then you can define it outside with:
BufferedReader br = null;
try {
    br = new BufferedReader(new FileReader(fileName));
}
The BufferedReader class opens up an input stream to the file reader you have specified, which in turn opens up the file you put in as an argument. With this, you can read in lines of data easily with the readLine() method of the BufferedReader class. You can also loop through the file until it is empty easily enough by comparing the incoming line with the null keyword – once the file has reached the end point, the incoming line will be null and you can break the while loop.
The BufferedWriter class opens up the output stream to the file writer you specify which will write to the file you have put in as the argument. However, there are two ways of writing to a file. The first is an overwrite – whereby the contents of the file are erased each time you write to the file and the last thing written will be the thing saved. So if the file already has data in it, by the time the BufferedWriter is finished, the only data in it will be the data which you have put in it. The second is to append – whereby the data being saved is appended to the end of the file. So if you’re reading in a file, and outputting to the same file (for whatever reason) then you would most likely wish to use the append method so that you did not lose the original data. You tell the BufferedWriter to append data by stating ‘true’ when constructing the FileWriter (see line 25).
When writing lines in Java it is important to remember to use the escape character \n for new lines (when using the bw.write() method).
Finally, you need to always close your files when you’ve finished with them, both input and output. Otherwise you may not be able to open them later (by your program or other editing program (if you’ve saved in a compatible format) as the files won’t register as being freed up for operations by others. You can kill the process holding your file open in the task manager but this won’t help your users and you run the risk of corrupting your file. So always close your input and output files with the simple close() method.
C# FileIO
C#, Microsoft’s response to Java, also contains friendly ways of handling FileIO. If you have a good C# editor and compiler (such as Visual Studio) then you can create quick scripts in a similar fashion to Java with ease. C# has the advantage of course that it can be coupled with a C++ engine with CLI (discussed here) which Java does not. Of course, your choice of language should always reflect the project in hand – something simple (even with a GUI) might be best off being done in Java, but that’s not a discussion for here. Other alternatives are where the language is set by the development engine. For example, Grasshopper, a parametric modelling environment for the Rhino3d modelling software, works in C# for custom components (including the component called a C# component). It should be remembered that, while Grasshopper provides some basics in this component, the core of it is still C# and therefore any C# operation can be used in it without too much difficulty (as seen here).
To use C# FileIO operations you need to use the System.IO namespace in order to gain access to the items described below. This C# example also contains the use of built-in dialog boxes from the Microsoft libraries. This can be created in Java but they’re slightly more work.
Using the dialog commands gives our user a user-friendly way of selecting their files for saving and loading in a similar way to the Microsoft products (Word, Excel, etc.). To save space, the save and load ones have been combined in this example with the load functions commented out (so that you can test the code as is and it should compile).
For the IO operations, you get the StreamWriter and StreamReader classes. These operate in a similar way to the Java equivalents in that they open streams for reading and writing. Unlike Java, StreamWriter gives you two options for writing data to a file, either appending to lines or writing to new lines. This saves you needing to use escape characters, but obviously be wary of which method you are using and make sure you’ve selected the correct one for your purpose.
For reading from files, you also have some additional methods available which allow you to get characters and peek the contents of the file without taking it from the stream (see lines 33 and 34). Although typically these would return chars (remembering that single numbers (0-9) can be represented as a char), you do need to cast them to chars as the methods will return the int representation of a char. Thus, the following would be correct, but you might not be able to understand the output.
int c = read.Peek();
Similarly to Java, you can use a while loop to cycle through a file to get the contents line by line, however, you are also afforded the option to read to the end of the file from the current position. If you do this at the start, you would read the whole file in one chunk. So again, be wary of using these and make sure you’re happy with your choices before implementing them.
At the end, remember to close your file. Note that C# uses a capital C on the method, whereas Java and C++ use a lowercase c.
C++ FileIO
C++ is the last of the FileIO examples being demonstrated in this post. In a good program, you might combine the C# GUI with a C++ engine and if the data is in the engine, it would be inefficient to send it to the C# portion for saving, thus the C++ basics are included here for completeness.
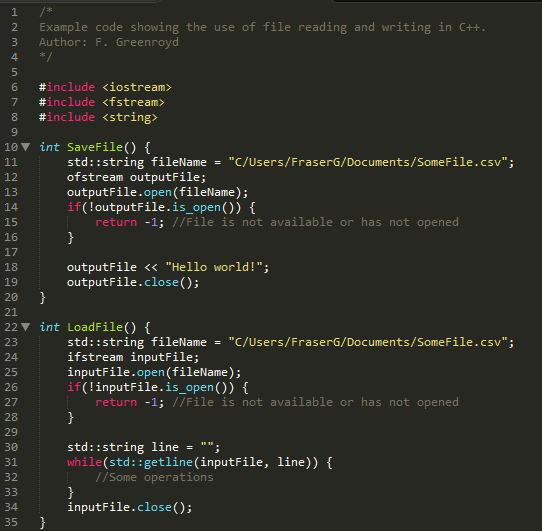
Using the C++ FileIO requires the use of the fstream (line 7). Although included here, iostream does not play a part in FileIO operations, but it does play a part in outputting to the command line and is shown here because of its relevance to the wider IO community, and a link is provided at the bottom of this post for more info on iostream commands and uses. fstream and ofstream are members of the std namespace, so you need to either use that namespace (not good practice) or use std::fstream and std::ofstream when using FileIO in C++.
The C++ FileIO operations are very similar to those in C# and so I won’t go into too much explanation of them. The main difference is in the output, using the << operator instead of a write method. Like Java, you would need to use escape characters for new lines and tabs using this operator. The get line method is a member of the std library in C++ so using the namespace std (not good practice) or, as shown in the example using std:: is necessary for reading from files. Unlike Java, there is no need to check whether the line being sought is null as the while loop will break when it reaches the end of the file thanks to the implementation of the get line method in C++. The parameters which you send to the get line method are your ifstream (with your opened file) and the line to which data should be saved to for operations (line 31). Again, as with the others, remember to close your files when you have finished.
Other languages
Java, C# and C++ are the languages which I commonly use in my day-to-day workings and so these are the ones I’ve decided to give examples for (helpful reminders for when I next get stuck on them). However, if demand requests it, I can do a post on other languages basic FileIO operations. Alternatively, a quick Google search would usually return key results (for example searching “Python FileIO” will usually return the necessary help).
Further Reading
Java BufferedReader API and methods
Java BufferedWriter API and methods
C# StreamReader API and methods
C# StreamWriter API and methods
C++ Basic FileIO tutorial
C++ fstream API and methods
C++ iostream API and methods
Google Protocol Buffers


